Note: All images are original unless otherwise credited.
Many of my projects start from a spark of inspiration, and the harmonograph is no exception. A while back, I stumbled upon the delightful collection of mini-books by Wooden Books. Starting with Li, my reading list gradually filled with more titles from the series. I remember wanting to buy several of them from their website one day and being instantly captivated by the cover of Harmonograph. The pattern reminded me strongly of the artworks generated in my creative coding project, Shadow and a dancer, and instantly evoked Lissajous curves. There’s something inexplicably mesmerizing to me about such patterns — something about the way lines intersect, part, condense, and disperse in rhythm feels visually profound to me. Harmonograph drawings, in particular, bring to mind one of the most romantic concepts in my mind: the universe itself.

Speaking of "harmon-"ograph, it appears to have some connection with music, then why am I talking about images? Sound is essentially oscillation, a wave, with frequency as a key parameter. Some musical tones are "harmonious" due to specific frequency relationships between their pitches, such as 1:2, 2:3, or 3:4. When those waves overlap, the resulting wave is also periodic rather than chaos. A harmonograph drawing can represent such “harmonious” combinations on a visual aspect. If you happen to be familiar with pendulum art, you may already have an idea of how a harmonograph works; here, too, the resulting pattern is created from the periodic movement of pendulums.
But why build a physical harmonograph? The mathematical formulas that produce harmonograph drawings are readily available on Wikipedia, so creating them with code is quite straightforward. Just tweak a few parameters, and infinite patterns emerge effortlessly — In fact, excellent projects are already available online, so coding isn’t even necessary.
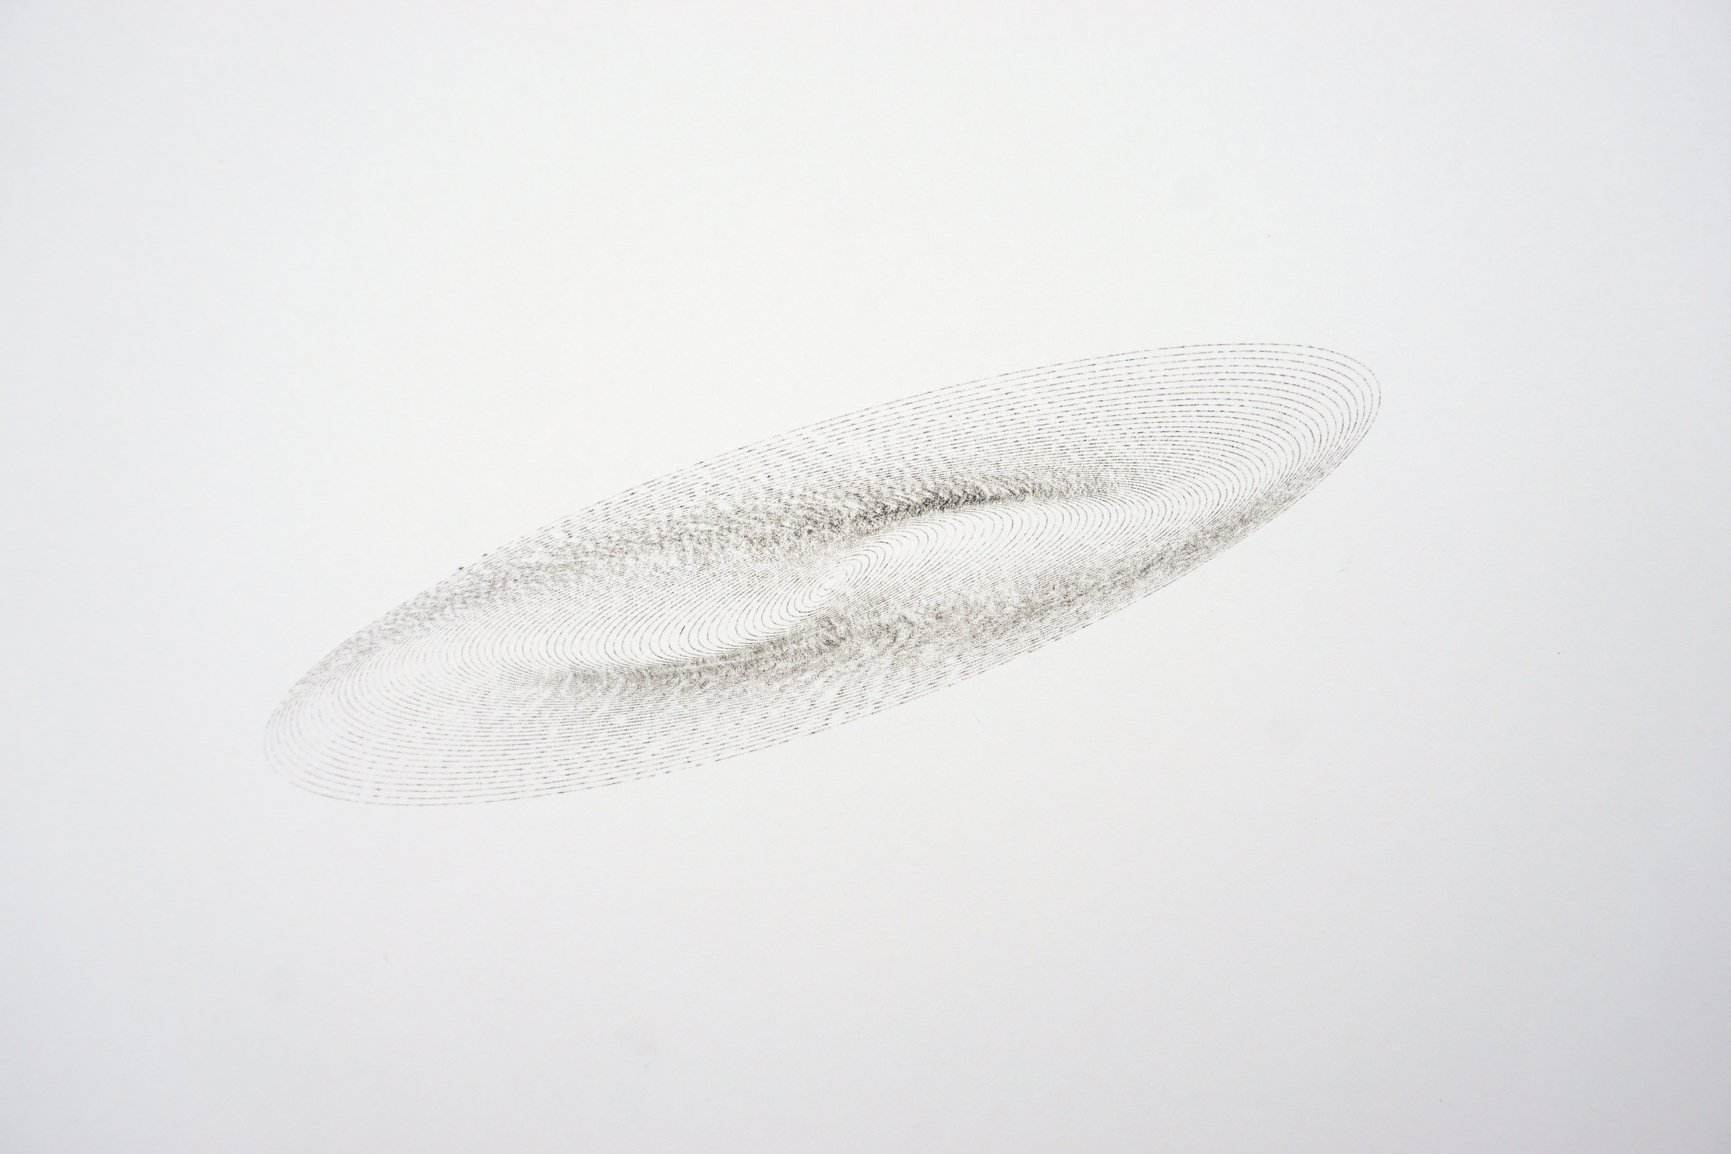
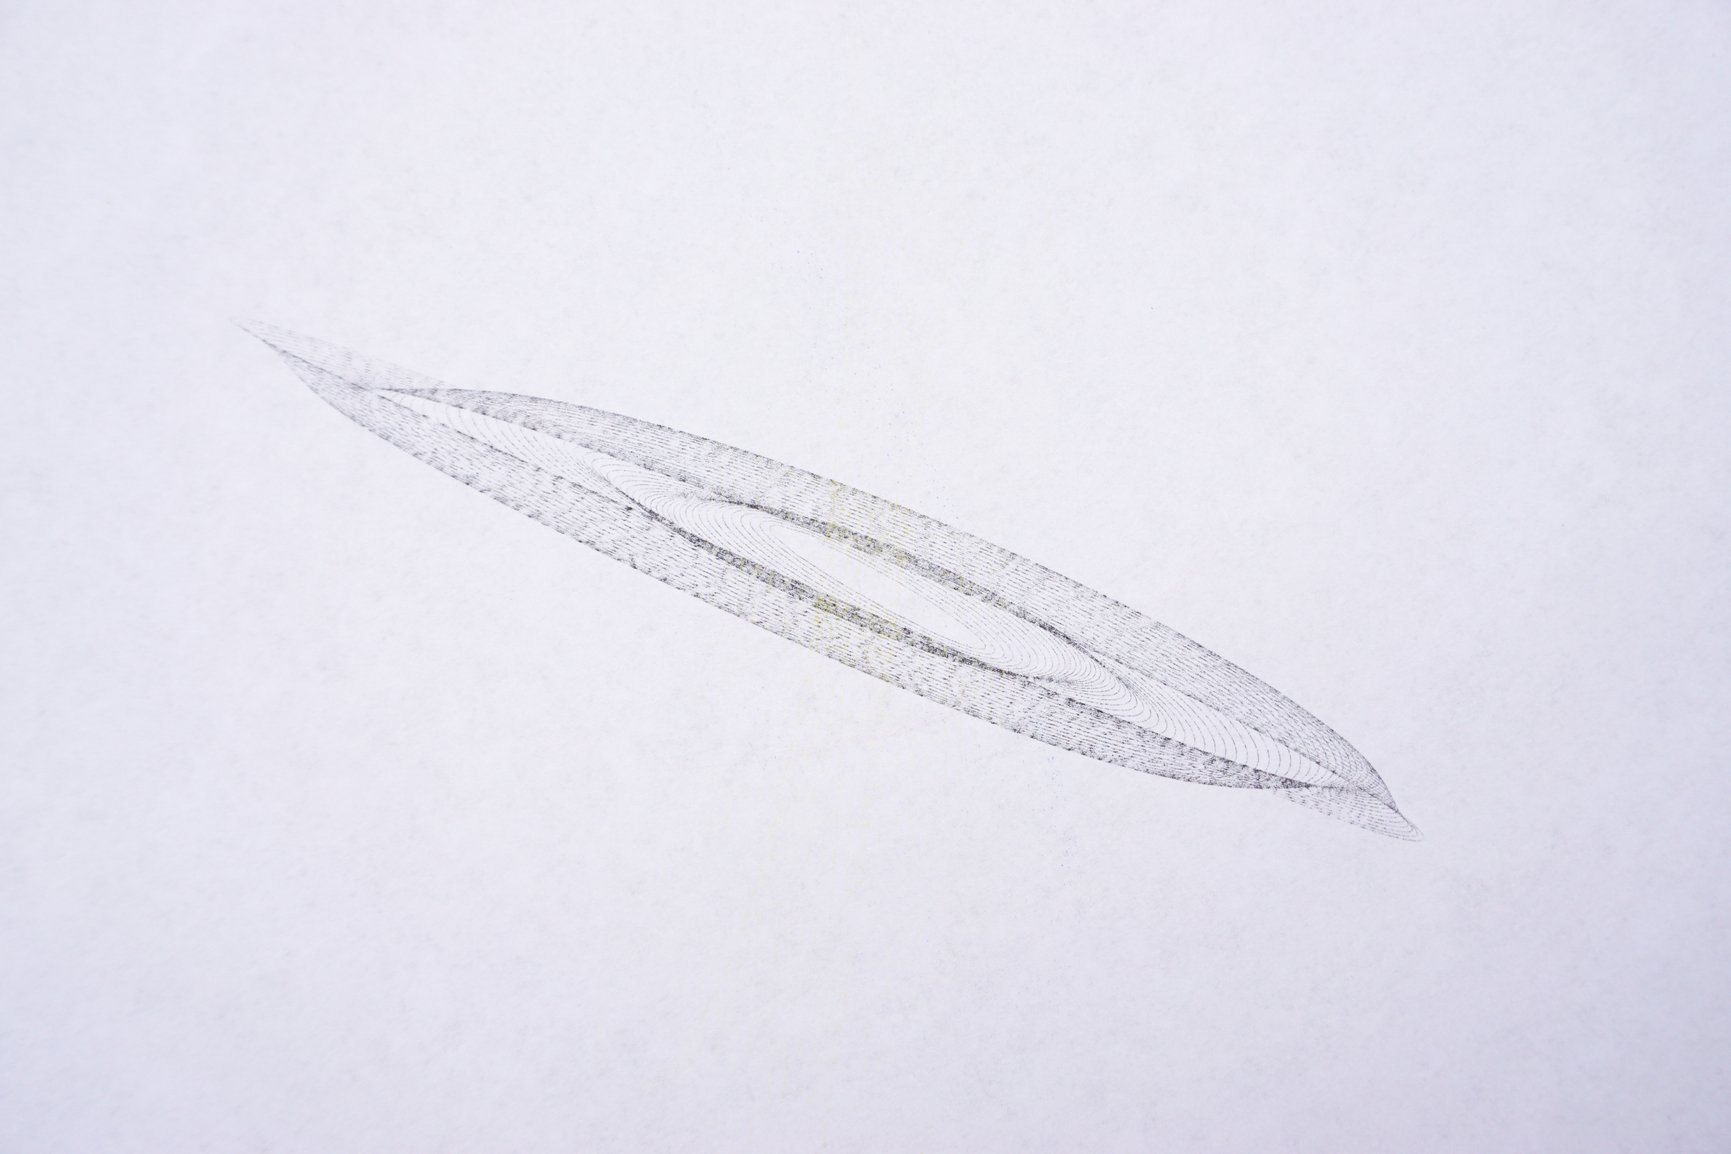
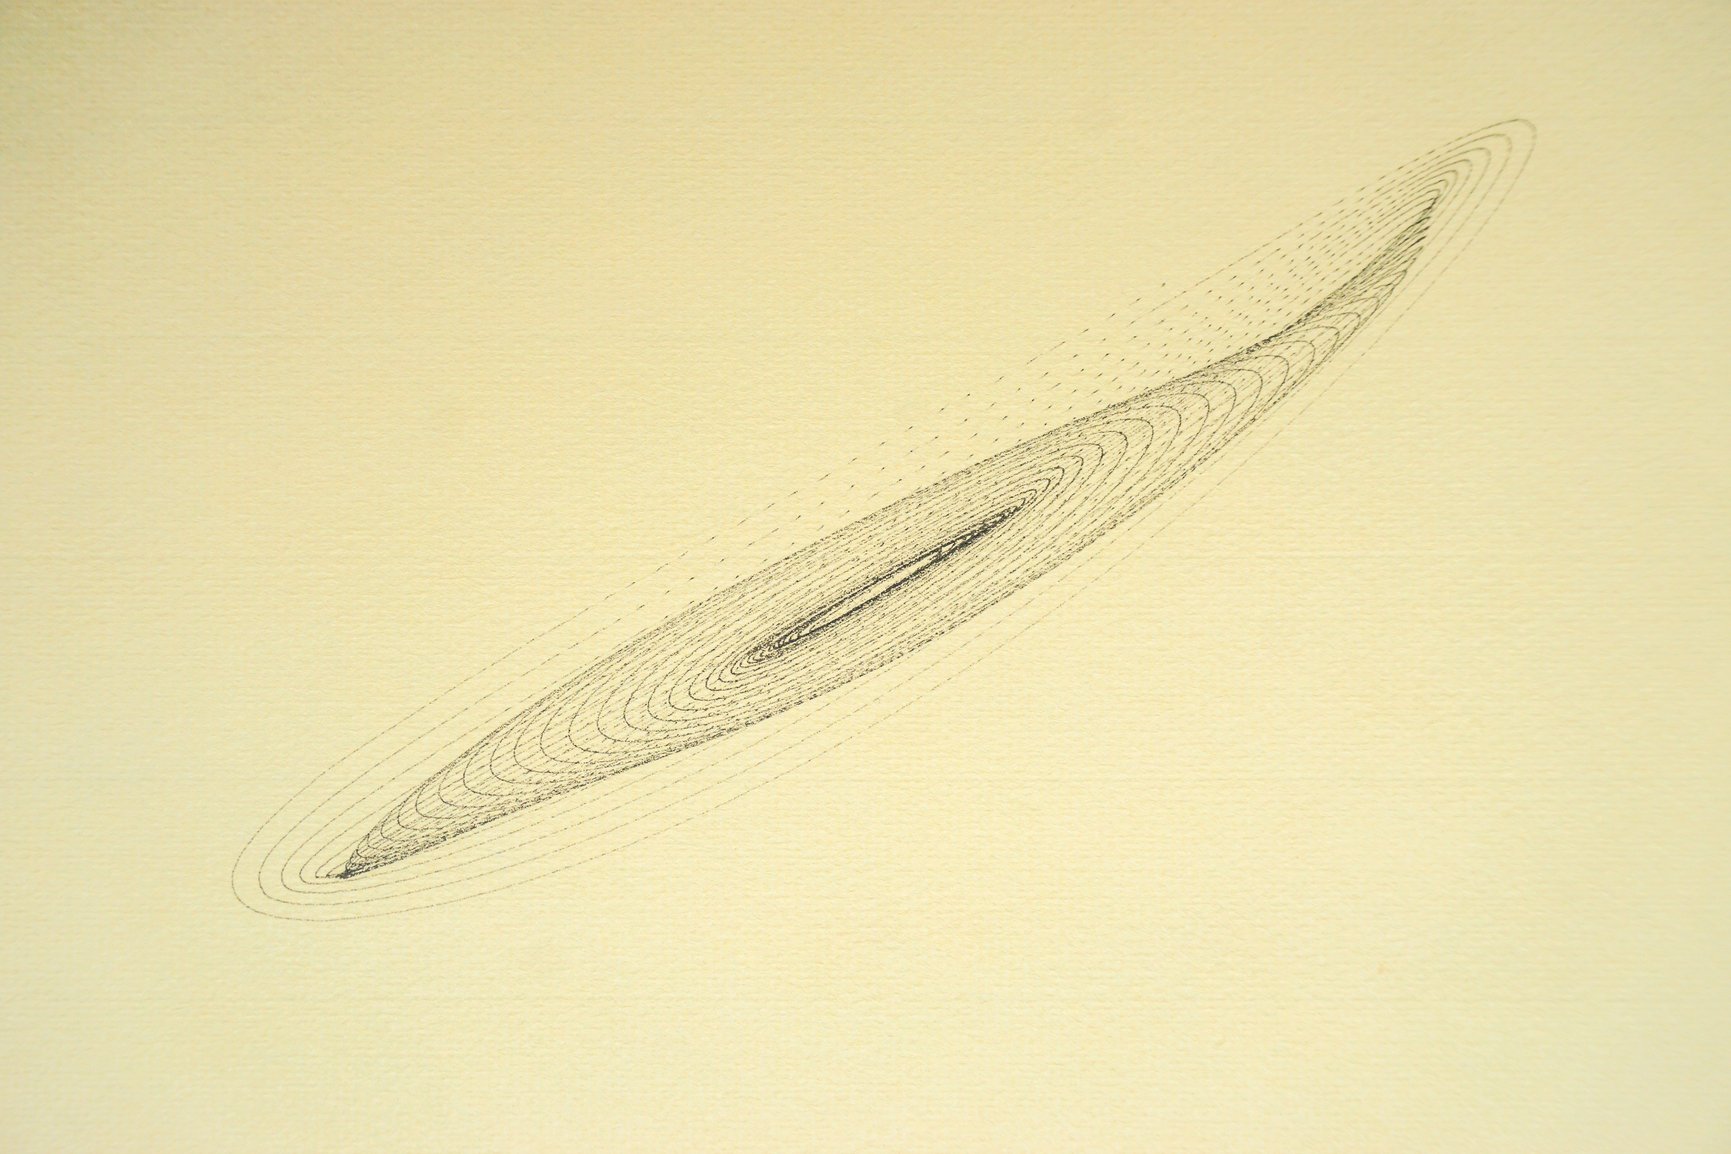
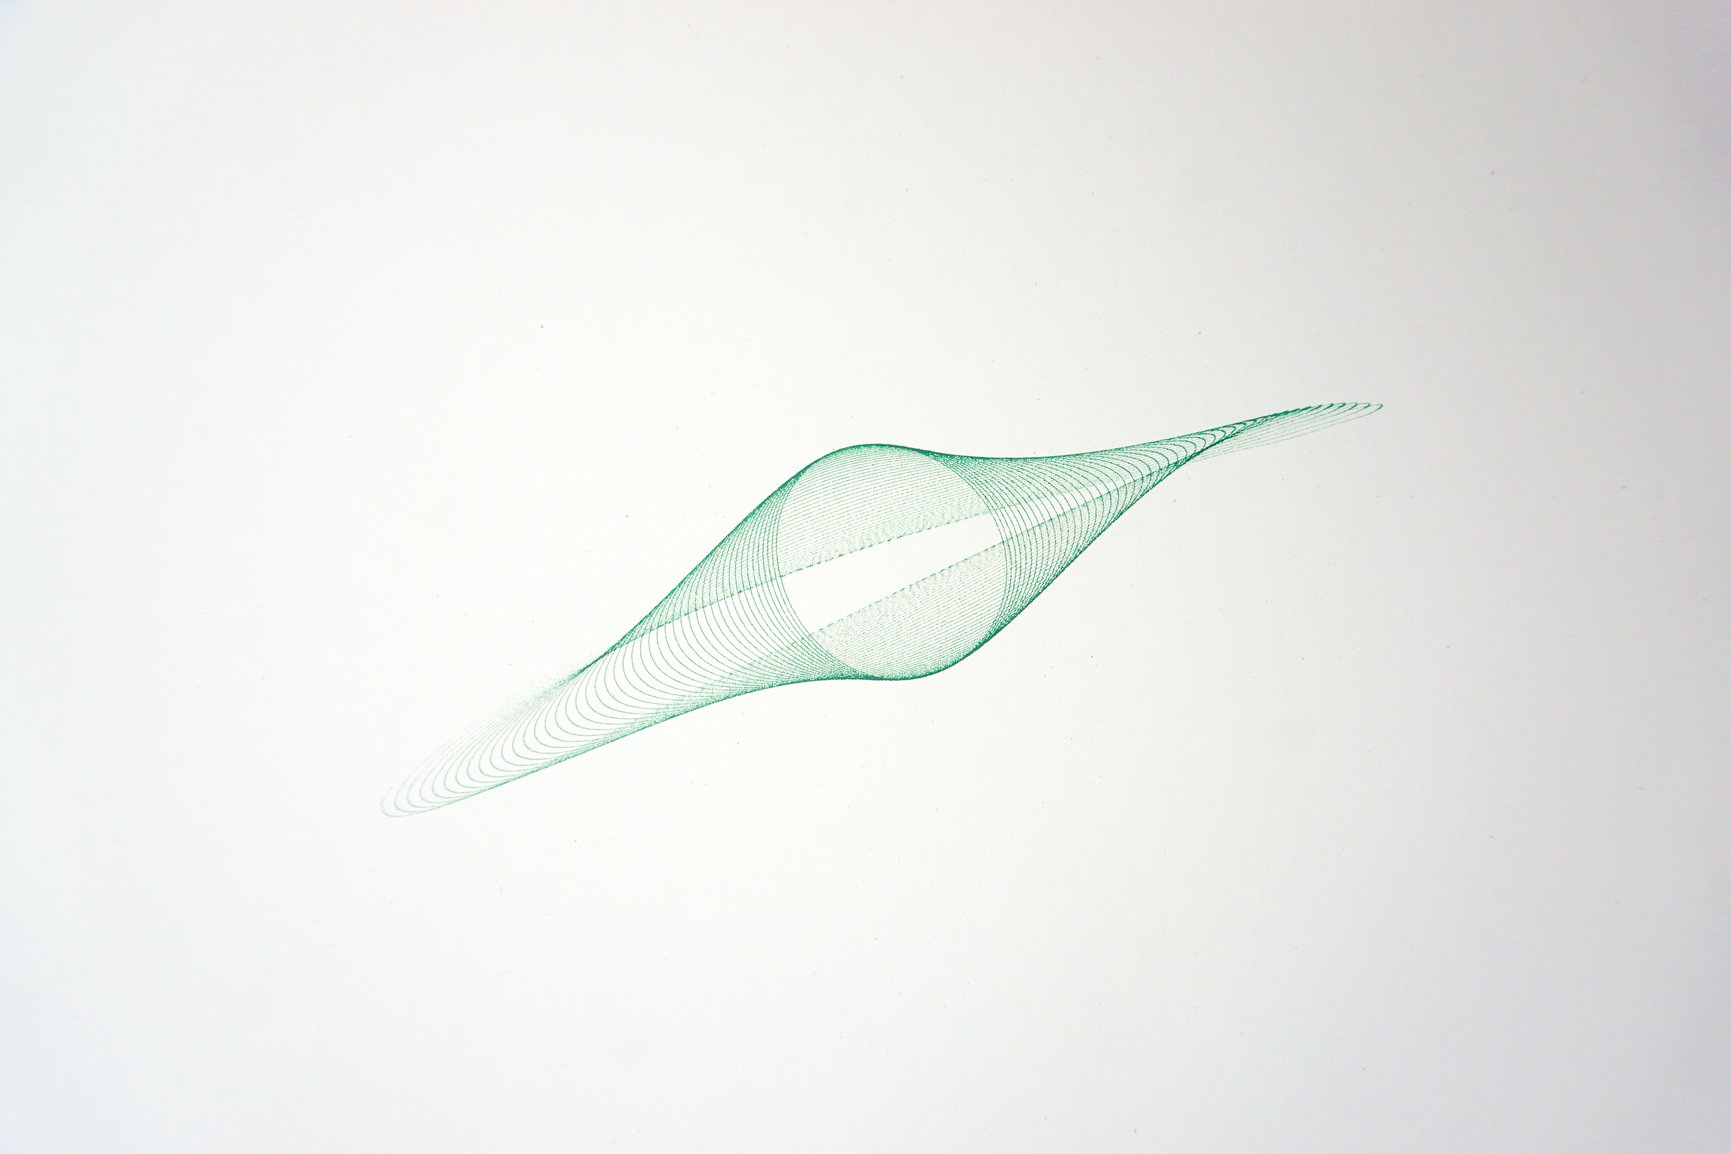
However, while reading Harmonograph, a concept on page 20 caught my eye — the arrow of time. This unsolved paradox in physics suggests that at the microscopic level, physical processes are thought to be entirely or largely time-symmetric: if you reverse the flow of time, the fundamental equations describing these processes remain valid. Yet on a macroscopic scale, time appears to have a clear direction. We cannot foresee the future, nor can we alter the past. Much like music, pendulums of a harmonograph eventually stop moving, and the line on the paper converges to a single point. This decay is inevitable in our physical world, as it is for us; the end is always there. The metaphor of life’s journey — from the early anticipation of the unknown, to standing at the juncture of past, present, and future, until the final bow — all unfolds in each swing in the harmonograph. It fascinates me deeply. No digital project could fully convey this experience. And, of course, the physical world is beautifully imperfect and unpredictable -- friction in various places (the joints, different paper types and pens), the imprecision from hand crafting, will all contribute to the final drawing, giving it an irreplicable charm.
![]()
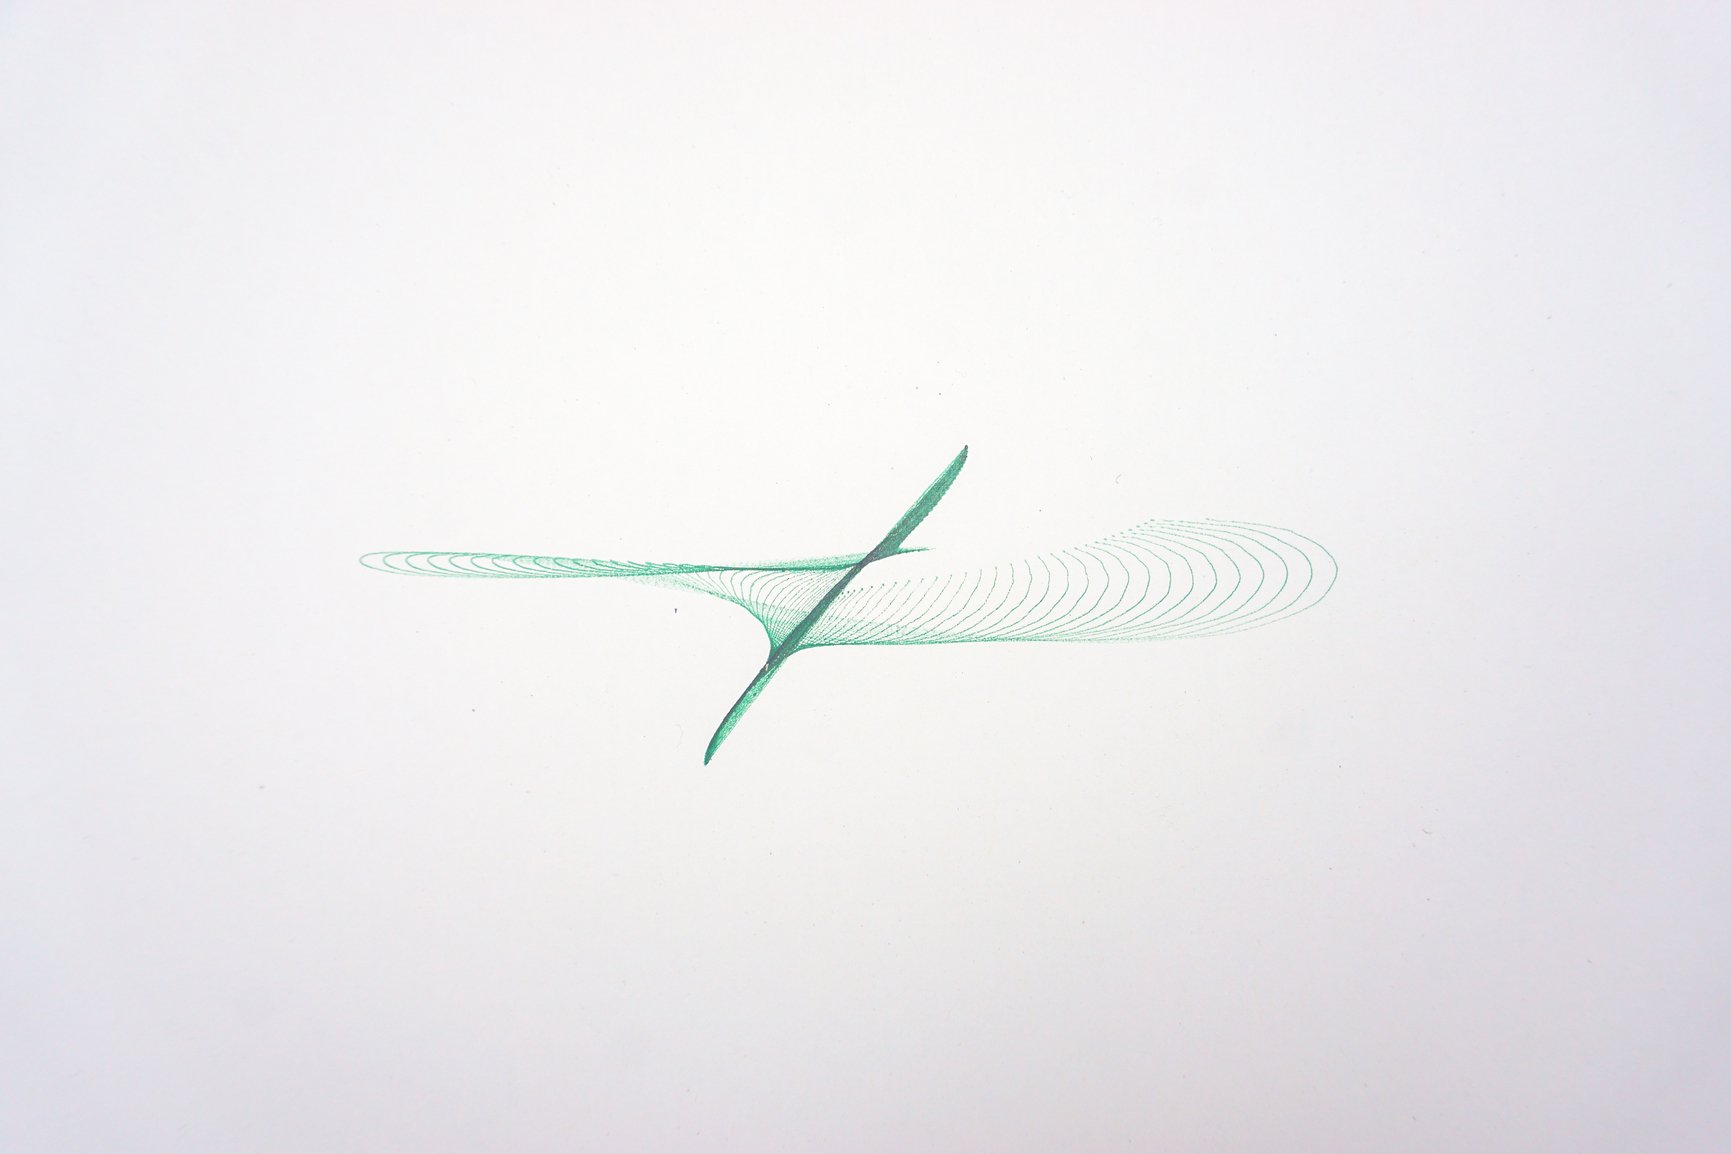
Watching a drawing slowly take shape, round by round, is especially soothing for me:
Often as I watch, hours pass unnoticed. Over time, I accumulated an incredible amount of drawings, and my Blue Universe cyanotype series is also based on this foundation.
In terms of construction, harmonograph generally comes in two types:
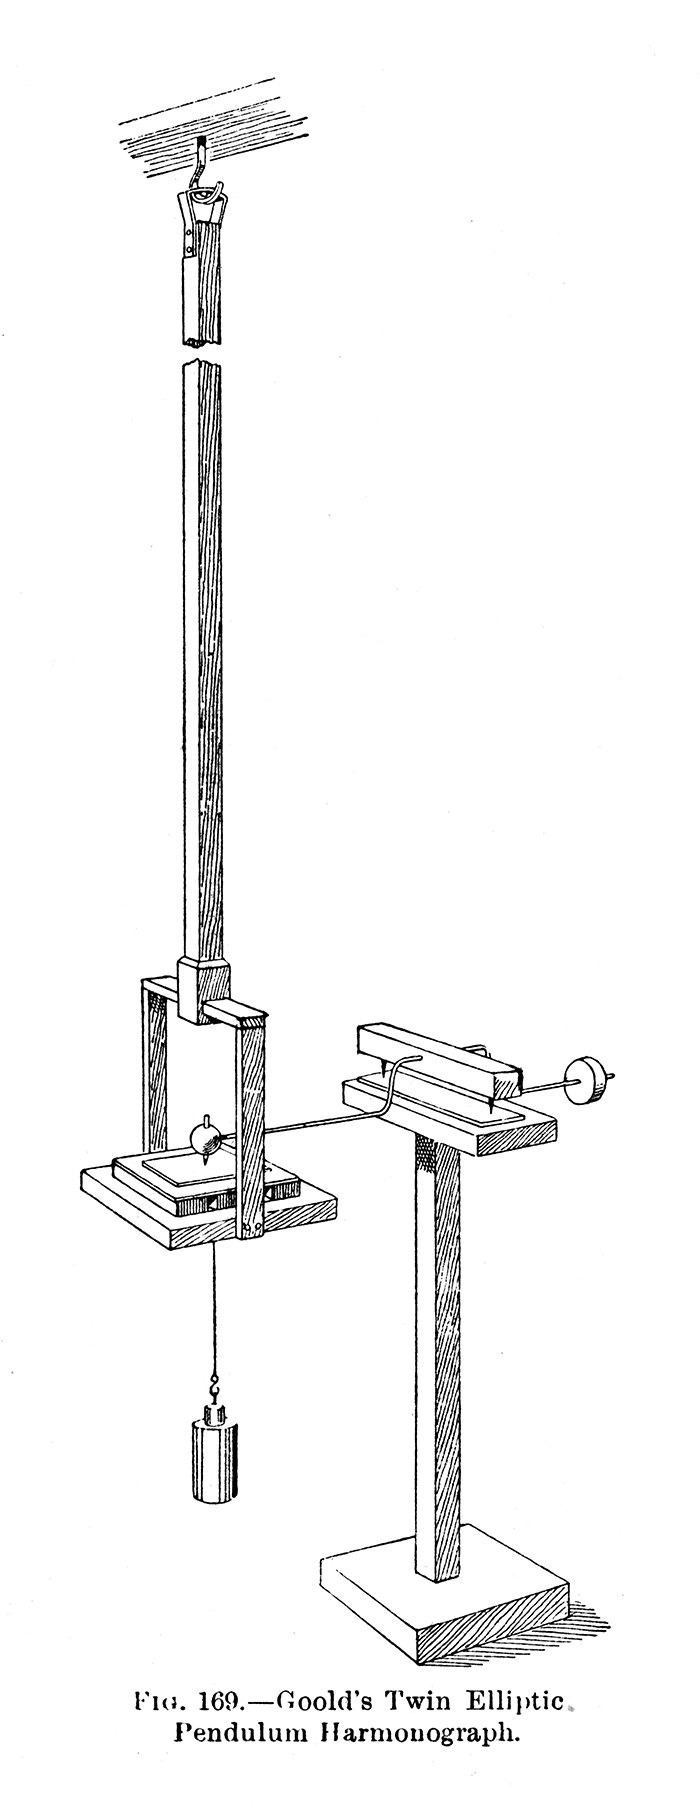
One type keeps the pen (primarily) fixed, best represented by Goold’s Twin Elliptic Pendulum Harmonograph shown in the image below. Here, the drawing platform on the left is suspended; depending on the positions of the weights above and below, its swinging motion is a result of superposition. The pen holder on the right can accommodate small vertical shift from the platform’s movement.
In the other type, the pen is free to move, as in the image below, where the drawing platform on the left and the pen holder on the right are each attached to separate pendulums (B and A) that can swing perpendicular to each other. The pen holder as well has some flexibility to accommodate the platform’s movement.
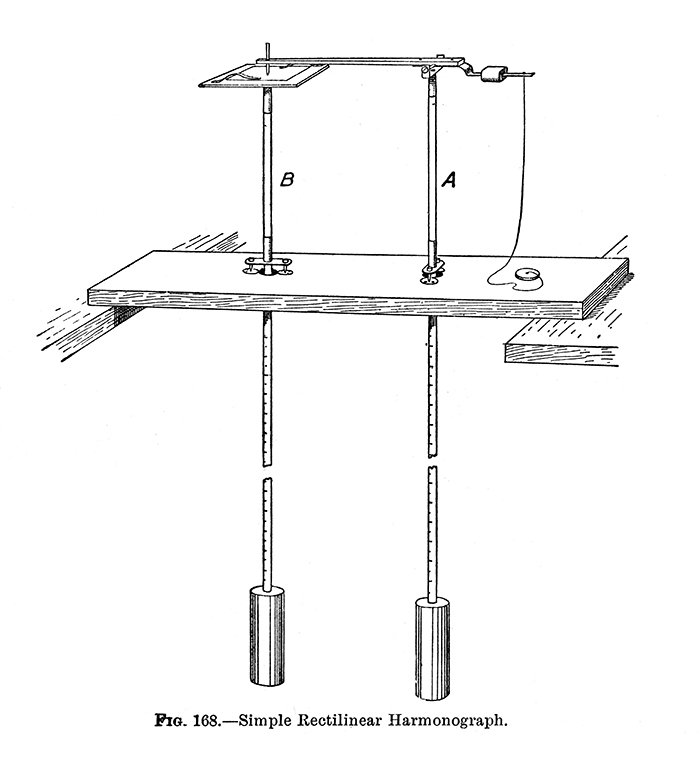
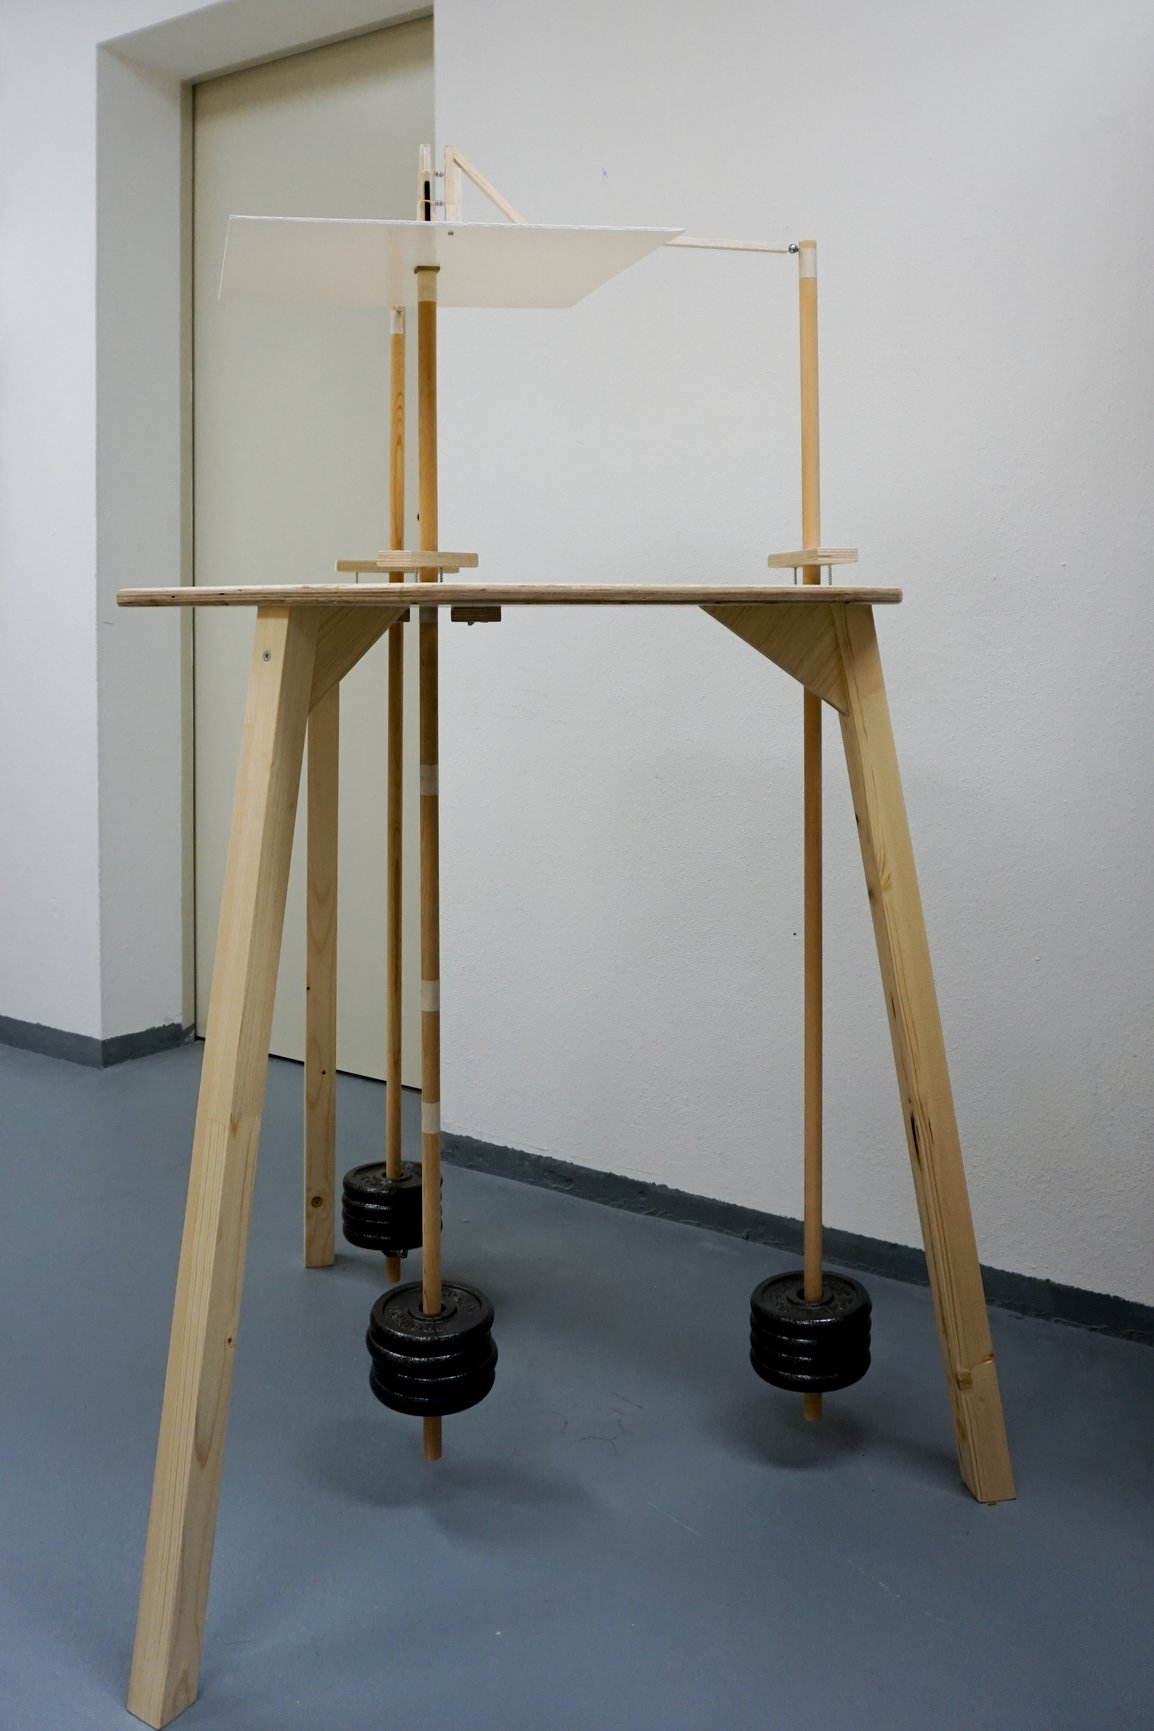
Since the two pendulums in this harmonograph each move in one degree of freedom, the resulting drawing comes from two linear motions. This is why it’s often called a linear harmonograph. A more complex version produces drawings based on two rotary motions, known as a rotary harmonograph. I chose to make the latter because, while Goold’s twin elliptic design is ideal to make drawings involving higher frequency ratios (2:1, 3:1, or even 4:1), it’s not very portable. Plus, compared to the linear version, the rotary harmonograph can produce more intricate drawings. In the rotary harmonograph, as shown below, the pen’s motion results from two linear pendulums that swing perpendicular to each other, while the drawing platform's motion comes from a rotary pendulum assembled with a gimbal. Thus, the drawing captures the superposition of two rotary motions.
As mentioned in the title, I will pick up some notes on the making rather than a comprehensive construction guide, because many people have already shared the specifics of their builds. Some resources that were helpful to me include:
- The final chapter of Harmonograph, which offers a guide on building a rotary harmonograph;
- How to Make a Three-Pendulum Rotary Harmonograph by Karl Sims, which I frequently referenced, especially for the overall structure;
- How to make and use a harmonograph by Wayne Schmidt, which provided useful ideas on gimbal and magnetic connections.
In my extensive research, I also came across plenty of interesting content, for instance, the breathtakingly intricate drawings in this video, a design incorporating three independent pendulums here, and an extremely compact and portable design here. The creativity and variety of solutions from different people tackling the same problem greatly inspired me throughout the process.
If you’re interested in making your own harmonograph, I’m sure these resources will spark plenty of motivation. With a general concept in mind, I began the design and construction as well. Here I'm aiming to document a few critical details, how I resolved some of my doubts and puzzles, then the iterations and improvements I made along the way.
1. I don’t have much space
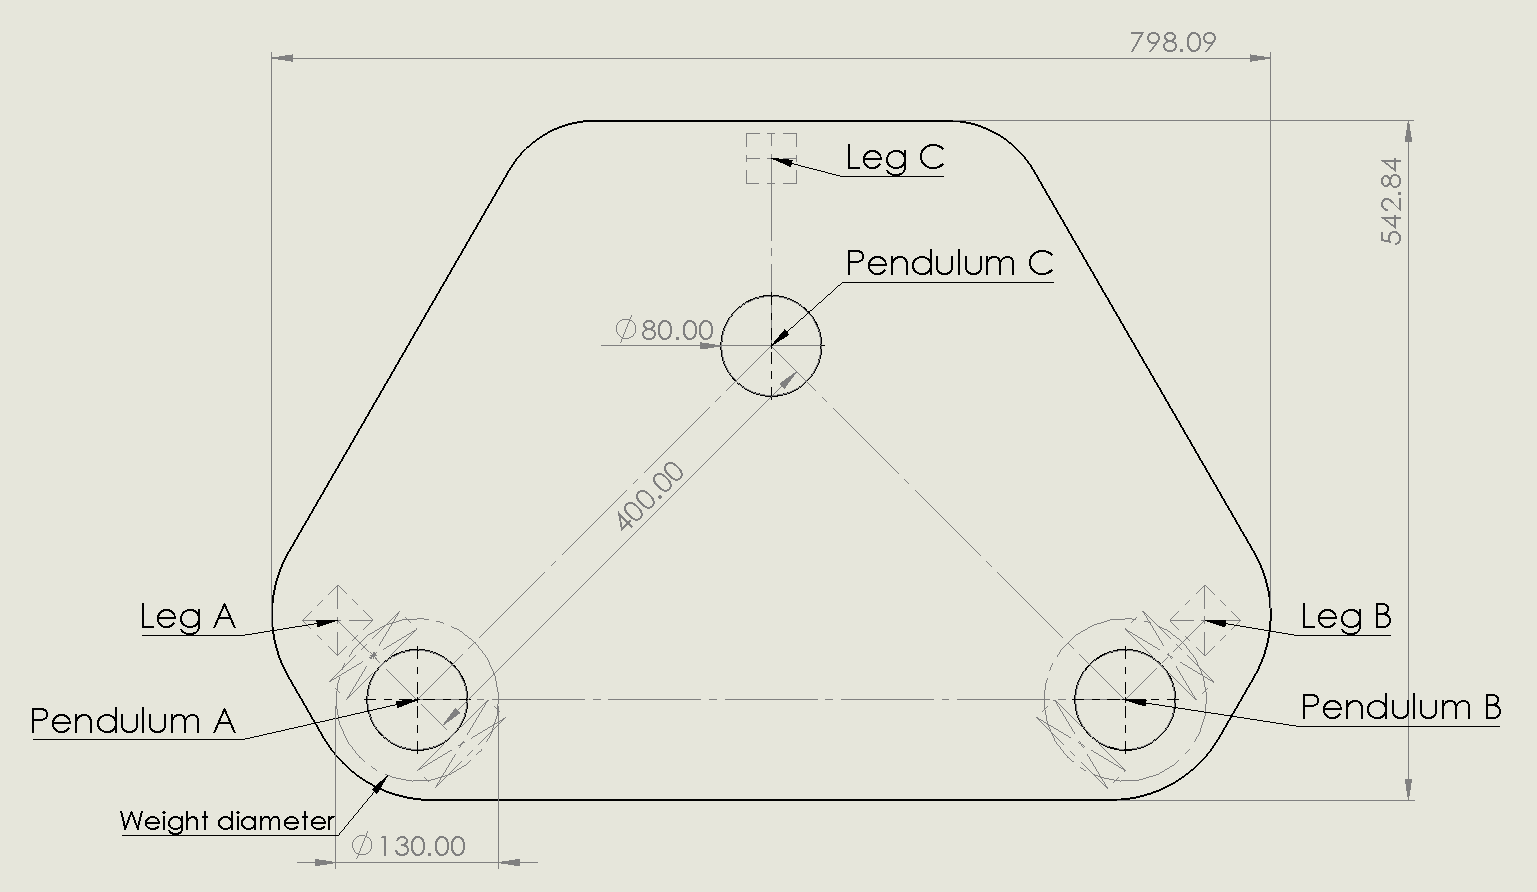
I believe this is a common issue for many — it's hard to find a large area to place a “not-so-practical” toy. So, from the outset, my guiding principle was to make the harmonograph as compact as possible without sacrificing much drawing area, ideally also keeping it mobile. The book Harmonograph recommends a tabletop of at least 60 × 60 cm to support three pendulums, which with splayed legs, means the entire setup requires an area of at least 80 × 80 cm. This is too large for my home. My door frames, for instance, are just a bit more than 80 cm, meaning that such a setup would be difficult to move if I ever needed to relocate it. In the end, I designed the tabletop based on the shape of an isosceles right triangle, positioning the linear pendulums A and B at the base angles. This allowed me to reduce one side of the tabletop to 55 cm while still ensuring enough swing space for all three pendulums through carefully positioned legs.
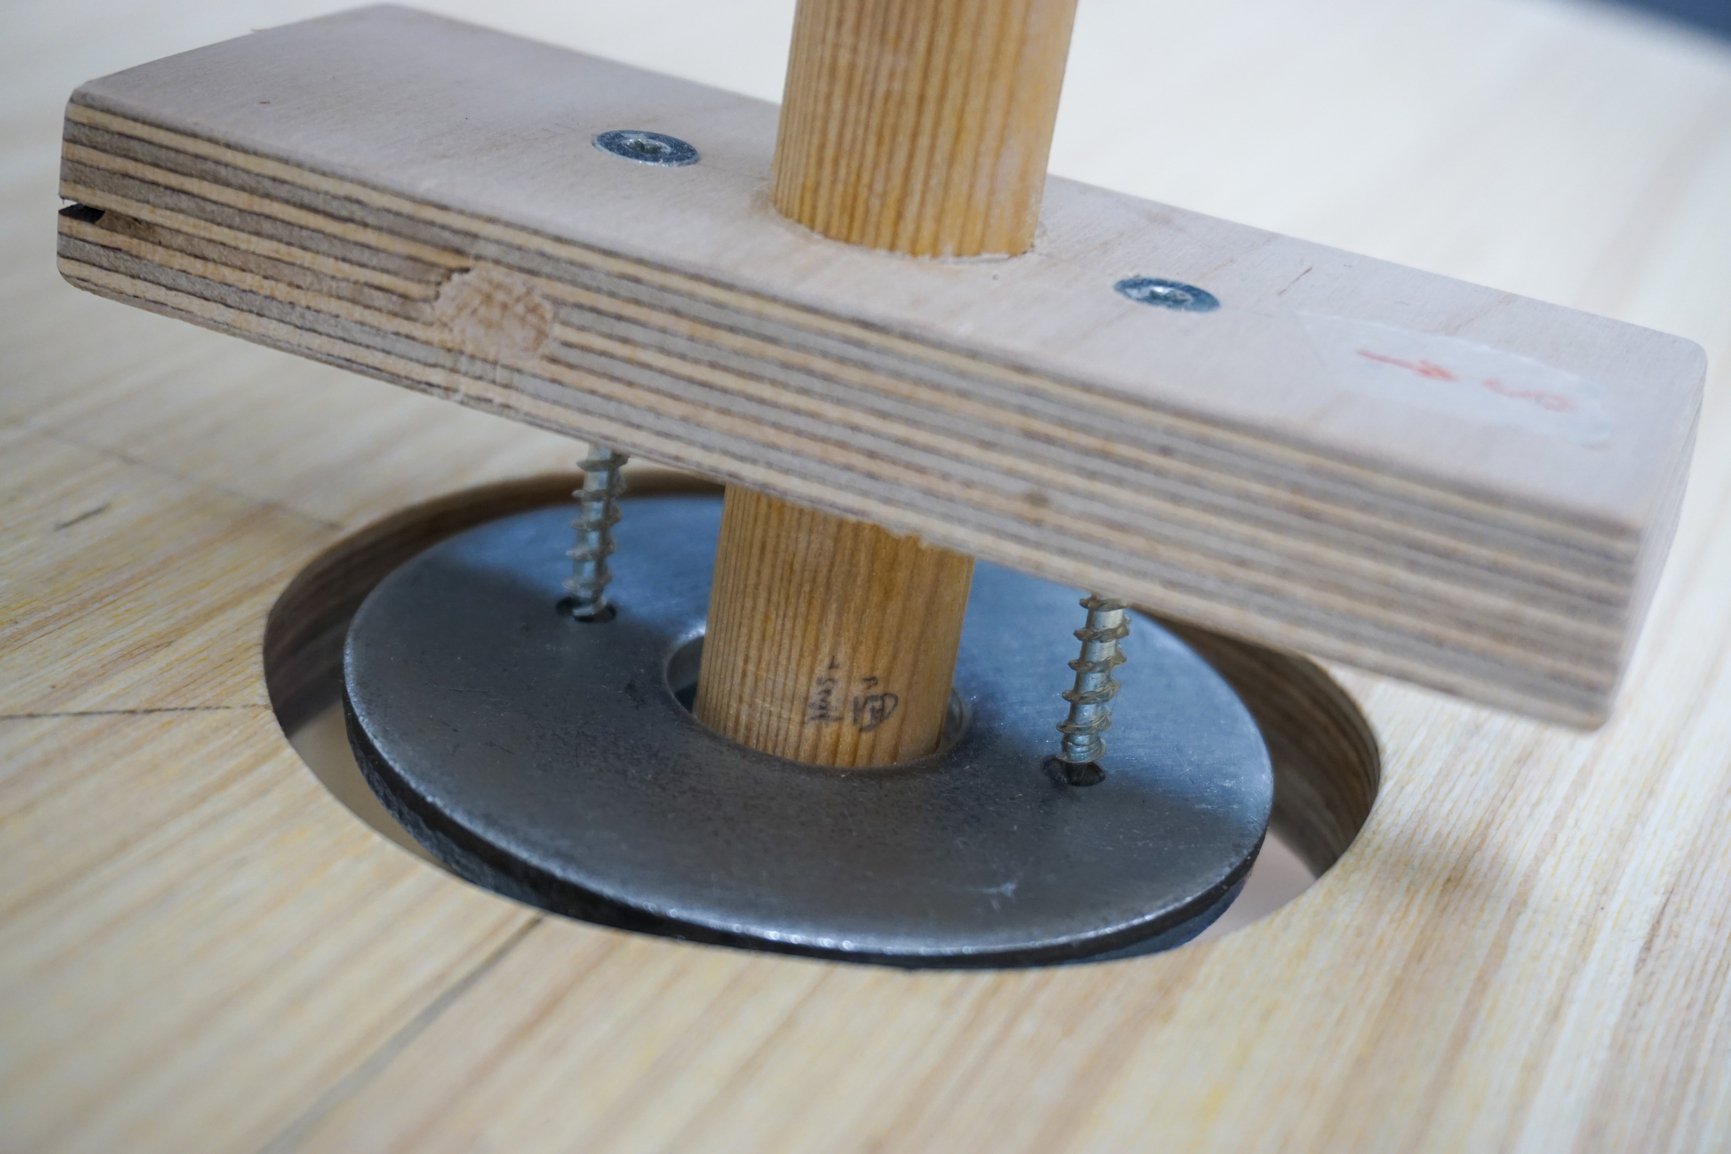
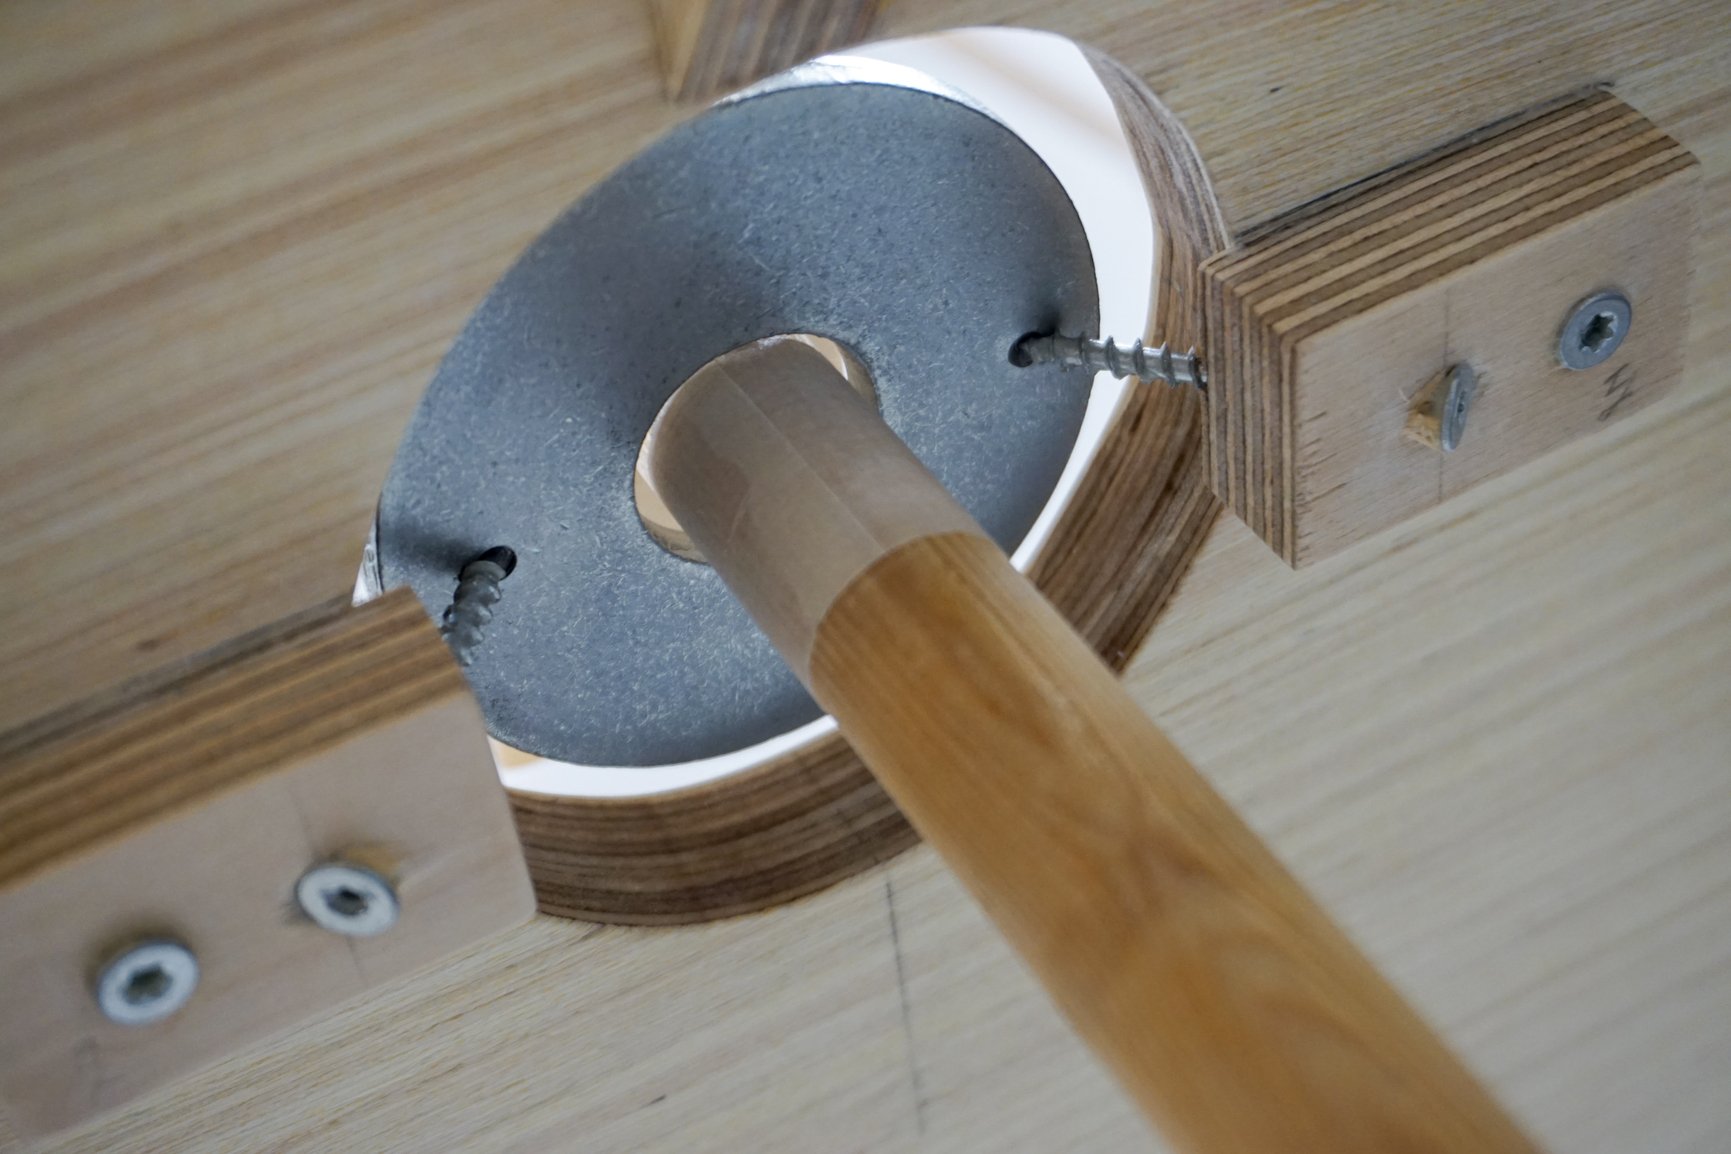
2. Choice of weights and fixation design
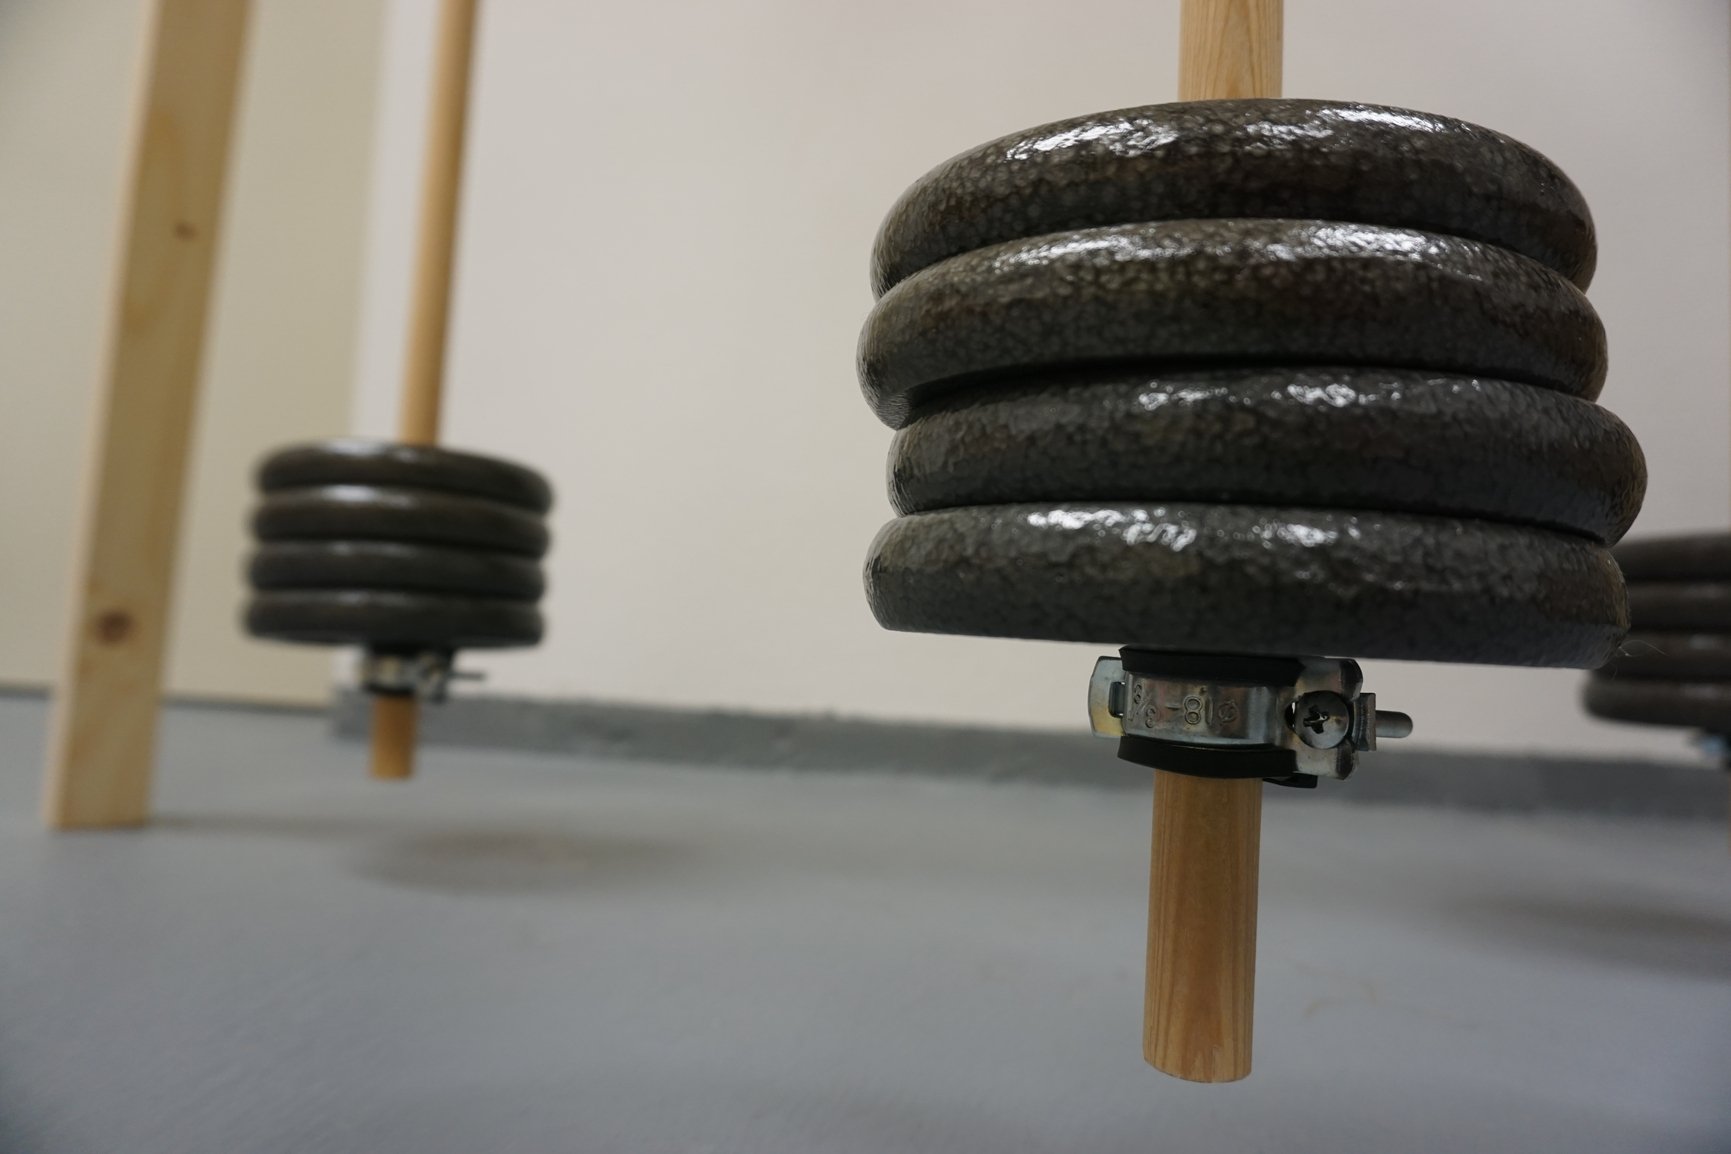
To achieve as long a drawing cycle as possible, the weights need to be heavy enough to sustain the pendulum’s motion. Due to my compact design, I had to choose weights that were both high-density and relatively small in diameter. I settled on cast iron barbell plates with a 25 mm inner diameter, 127 mm outer diameter, and a weight of 1.25 kg each, stacking 3-4 plates per pendulum. Regarding how to fix the weights, many people use A clamps. However, I’m not a fan of that, as it tends to be unstable and can damage the surface of the wooden pendulums. I also encountered a fishing rod-like pulley fixation system, which I found too complex for my needs. After multiple visits to a local hardware store, I finally found an ideal component in the plumbing section — hose clamps with embedded rubber rings. These provide good stability without damaging the pendulums.
3. Pen holder design
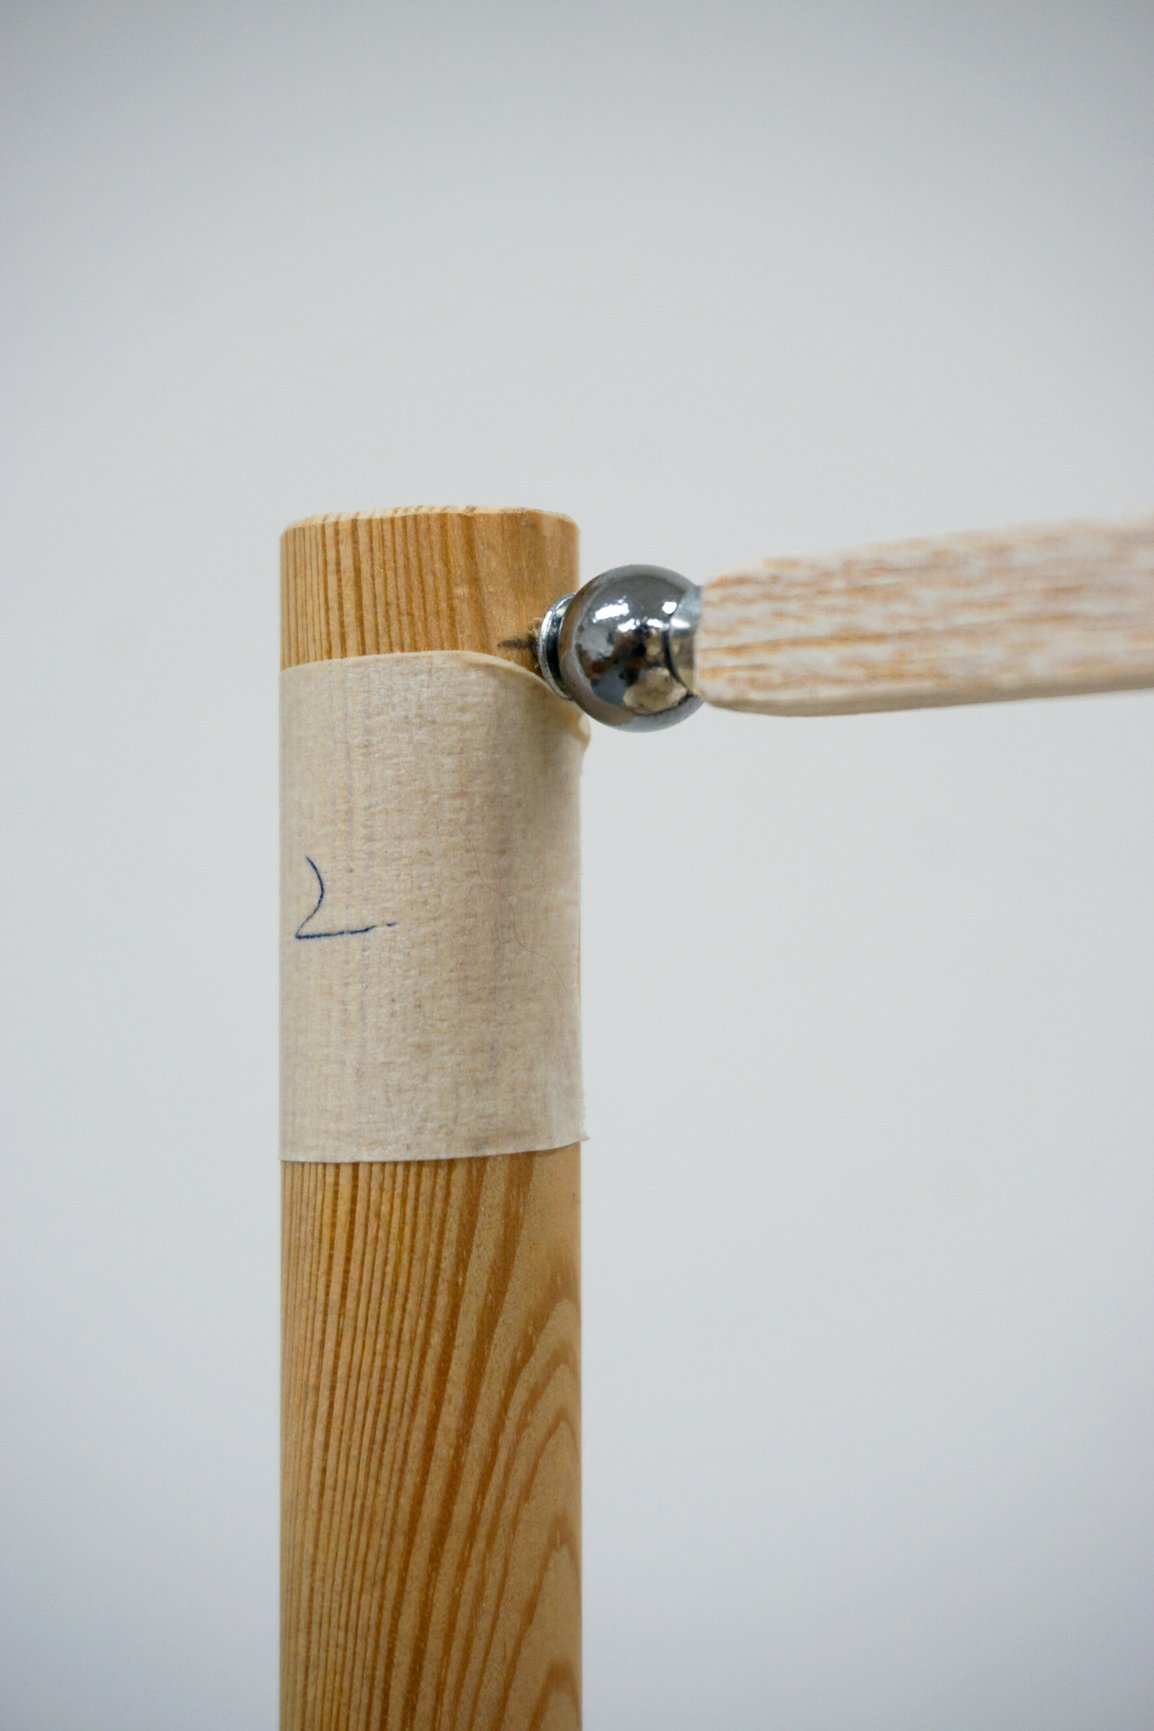
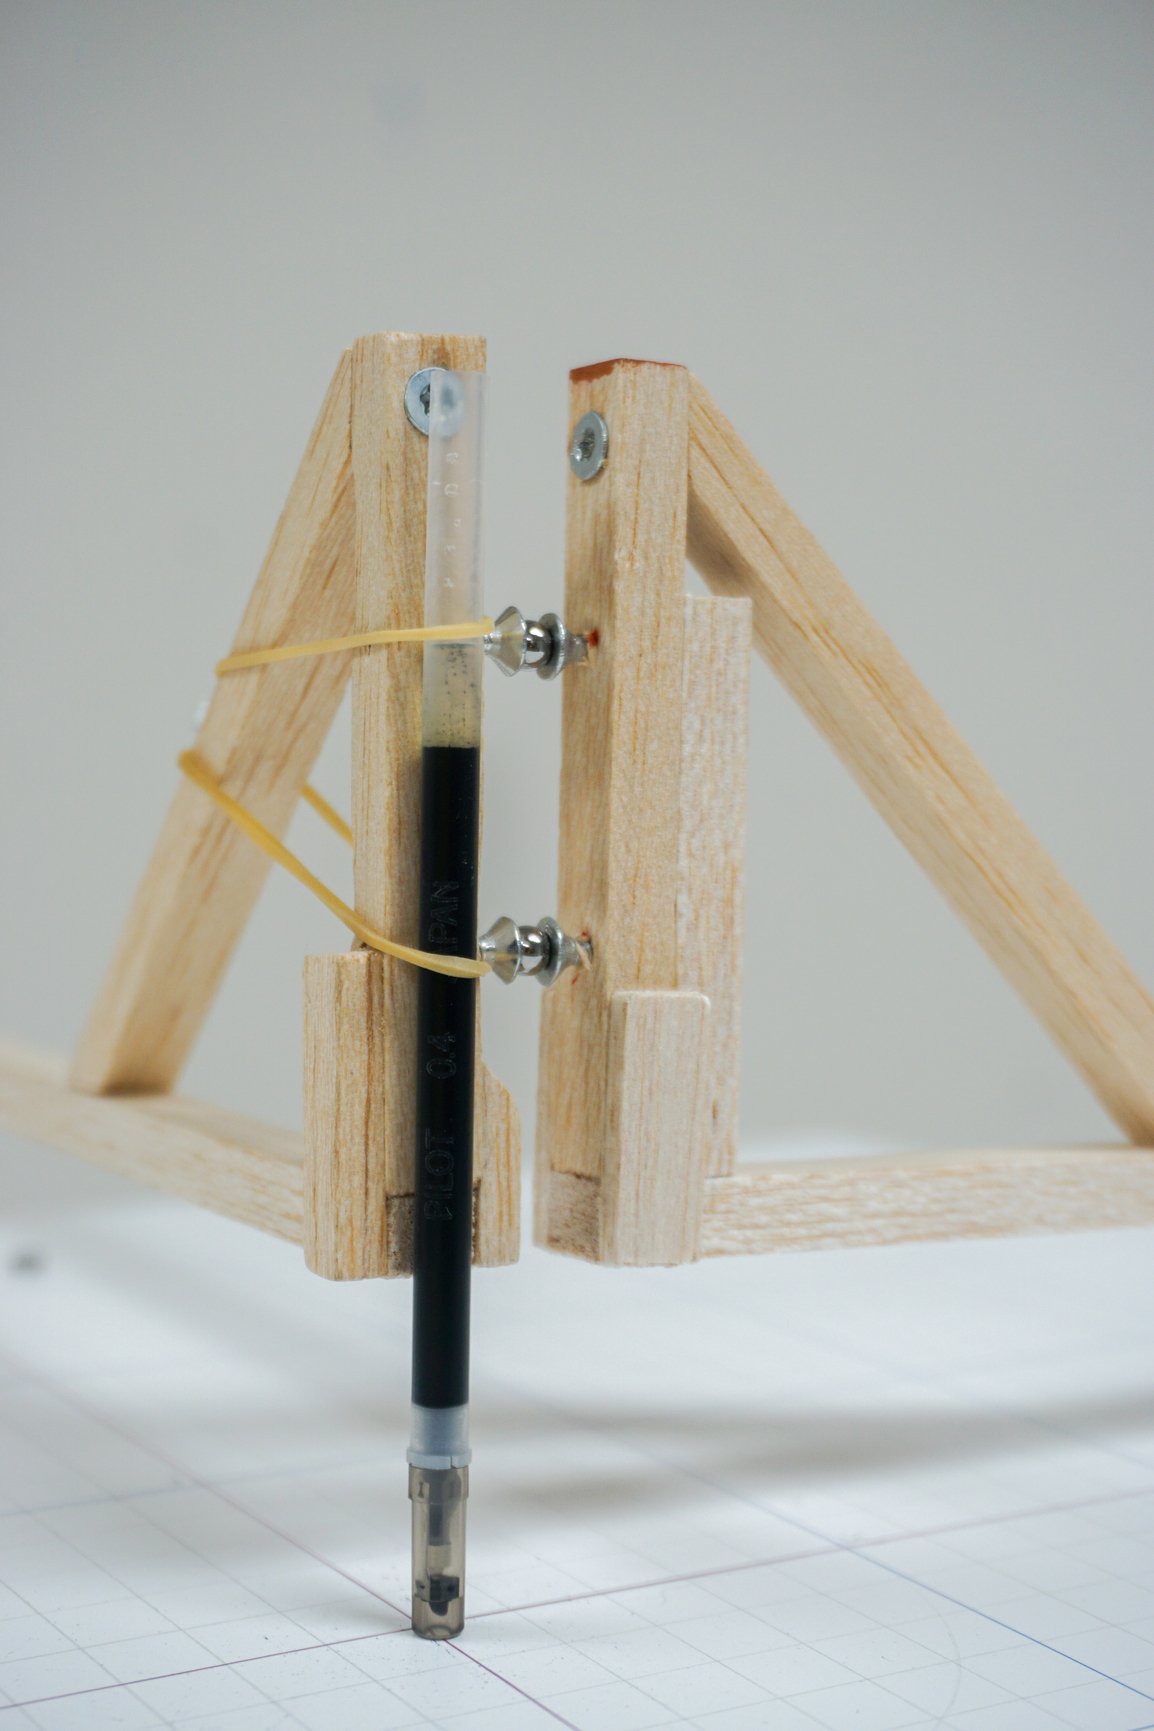
First, to minimize friction while drawing, the pen holder has to be made of lightweight materials, such as balsa wood, which is widely used in model-making. Although I hadn’t used it before, I found it very easy to work with. Balsa wood is exceptionally light, despite its low density, its fine and evenly distributed fibers make it surprisingly robust. Unlike many other soft wood, you won’t encounter splintering or chipping if you handle it carefully. Drilling holes, inserting screws, and cutting with a saw were all straightforward. The connection between the pen holder and pendulums also has various options. I used a magnetic ball, making it easy to lift or detach the pen holder as needed.
The end of the pen holder, where the pen is placed, offers many design choices as well. Some use split wood blocks to hold the pen in place, while others drill holes for inserting the pen. I opted for a simple rubber band fixation. Since I knew I would be using a variety of pens with different diameters, a flexible securing method is essential. The rubber band words unexpectedly well, as the low friction during drawing generally keeps the pen steady, and the tension in the band is sufficient.
4. Drawing platform design
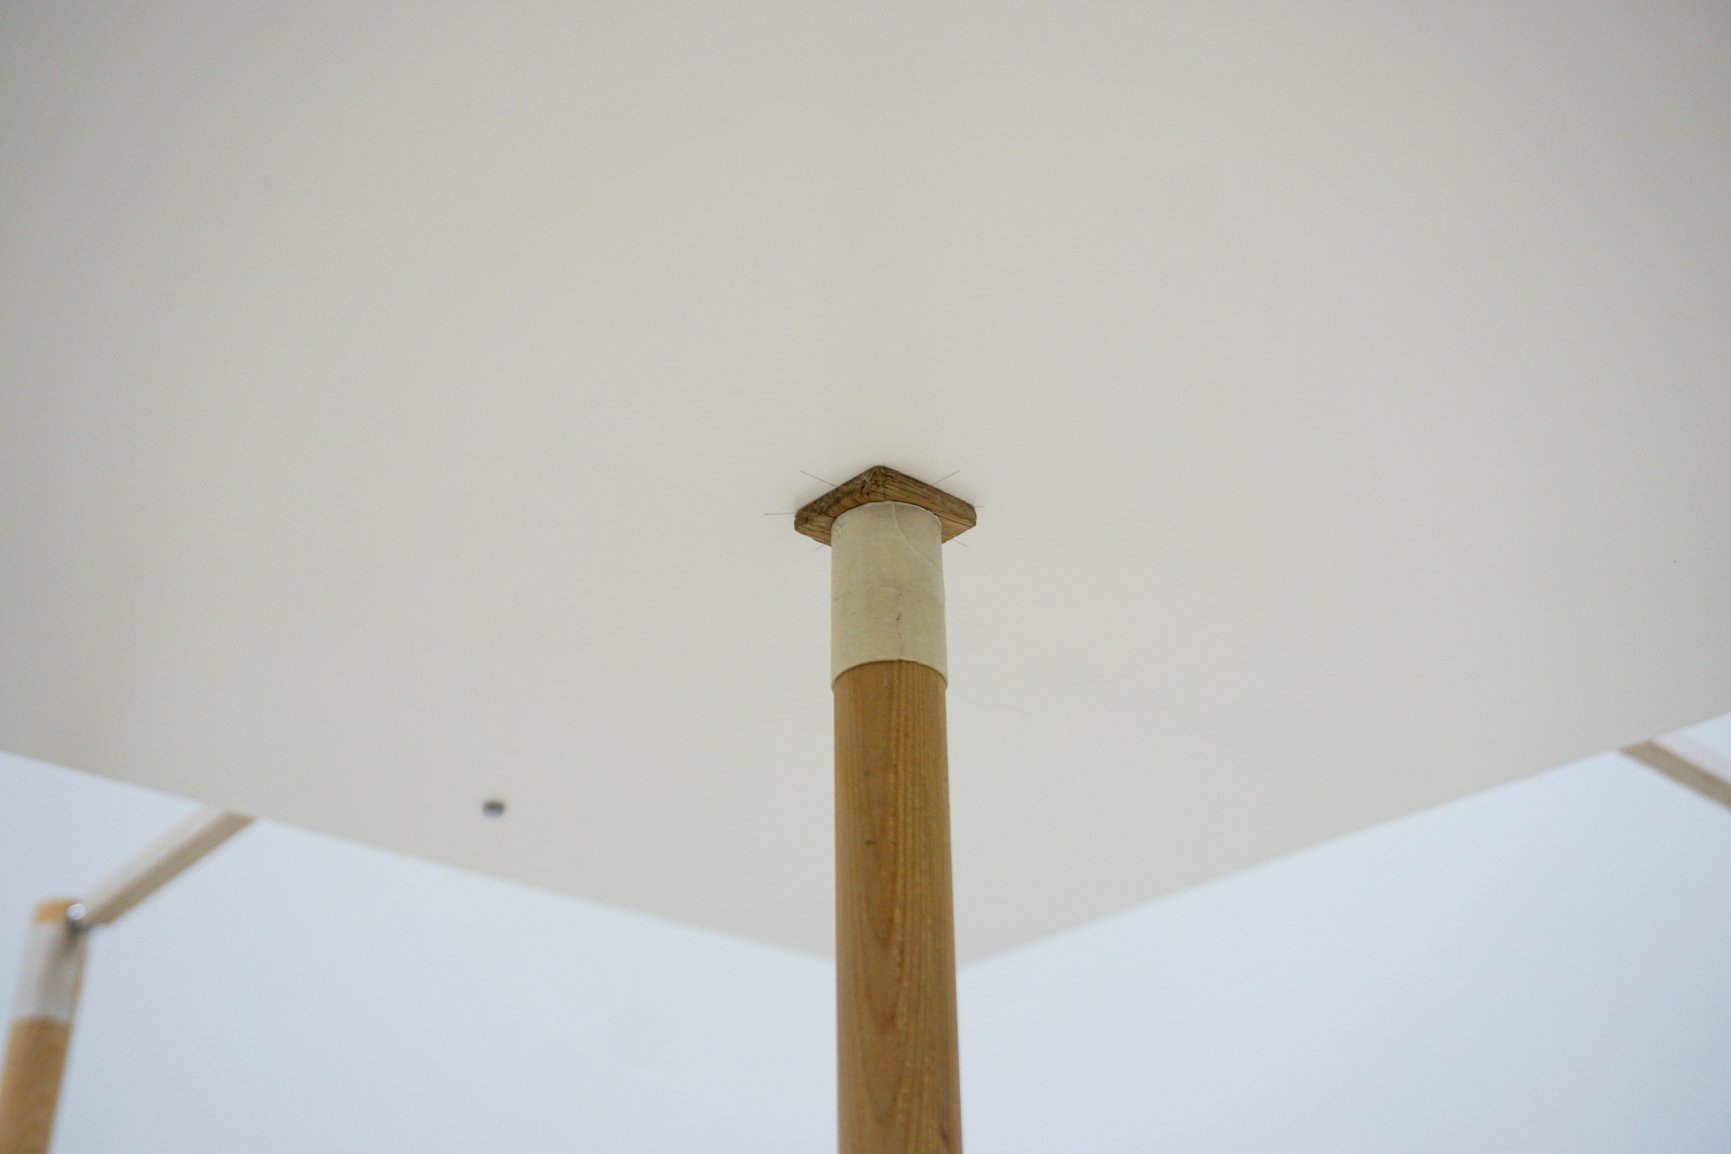
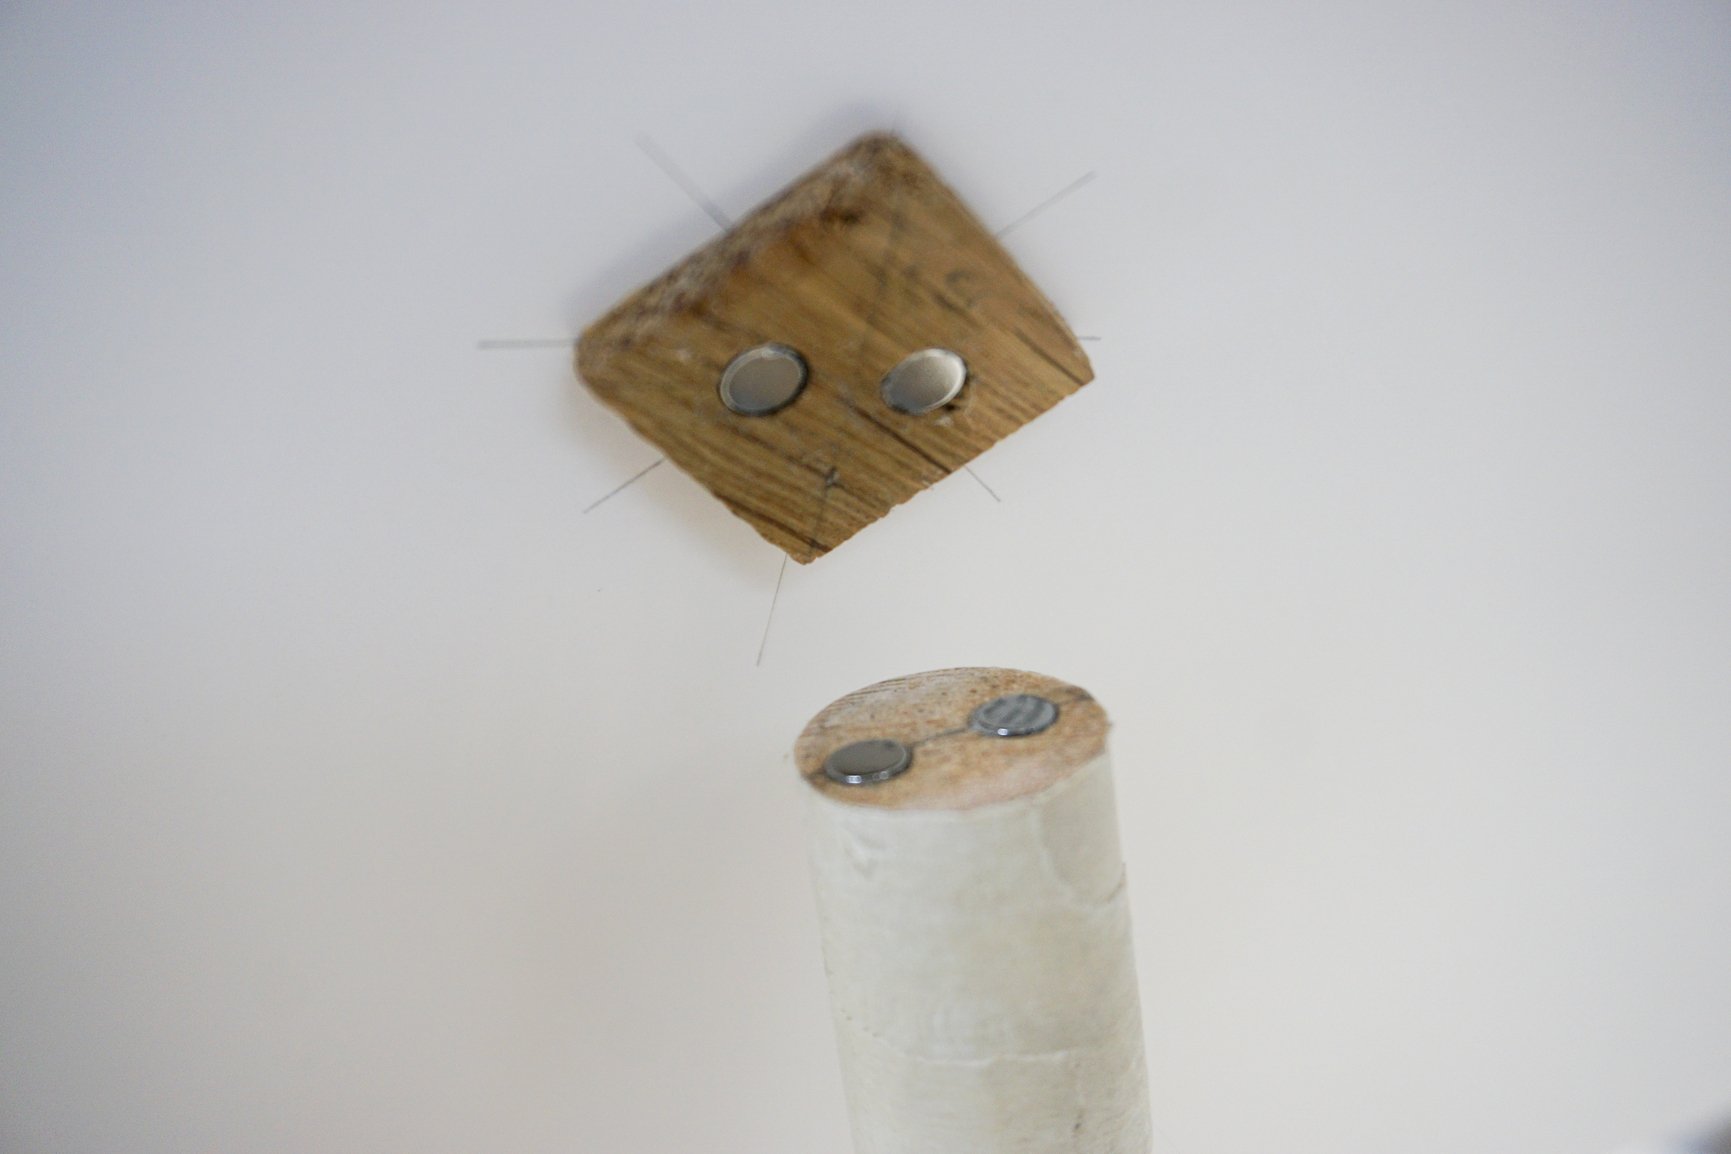
This was the first component to undergo an iteration, and I’m very pleased with my creative improvement here. As in many other areas, there are various designs available for the drawing platform, but essentially it's about attaching a platform to a rod. Initially, I drilled a hole in a wooden cube and glued it to the center of an HDF board, so that the pendulum could be inserted into. While this setup was detachable, I soon found that the platform was too heavy, causing the rotary pendulum to dampen much faster than the two linear pendulums, which limited the range of patterns I could create. This effect was particularly evident when I attempted different frequency ratios, such as 2:1, where the swing frequency of the rotary pendulum is doubled by lifting the weights much higher, resulting in rapid dampening from friction. So, I returned to the art supply store where I purchased balsa wood to search for a suitable lightweight flat material. I eventually chose a paper-coated foam board, which is both rigid and lightweight. For the connection, I drew inspiration from the various magnetic attachments I’d already implemented: at the center of the foam board, I glued a thin wooden piece embedded with magnets; the corresponding end of the wooden pendulum was also embedded with magnets. This allowed for easy attachment and detachment of the platform, which proved remarkably stable, never coming loose or shifting during drawing.
For securing paper, given the enlightment of magnets, it probably comes as no surprise that I used them here as well :)
5. Portability of the entire piece
Thanks to the compact design, along with the detachable pen holder, drawing platform, and weights, and the flexible assembly method of the three pendulums, the entire piece can be conveniently dismantled into several components for easy reassembly.
Like all woodworking projects, this one was a joint effort between me and my partner. However, unlike previous projects, this one was not a typical “furniture”. Though I could refer to some of the experiences shared by others, this one remains a very niche item, requiring unique problem-solving as others’ designs didn’t always suit my needs. We both enjoyed tackling each problem that arose throughout the process. Once the main construction was complete, sanding and oiling, which often felt tedious at first, became a soothing ritual. As I felt the wood’s increasingly smooth surface under my fingers, I knew this project was nearing its conclusion and that it would bring us much joy in the days to come.
Watching the harmonograph does its drawing evoke a similar feeling to stargazing, constantly reminding me that, as a small, fragile being on Earth, I am a part of this vast universe; many like me will be born and will perish, but that does not diminish the beauty of sharing a moment of life with the turning Earth, while I still can. Just as the pendulum moves with rhythm, no matter how impecable the design or the craftsmanship, its movement will inevitably come to an end; yet while it swings, we’re drawn to its past, present, and future. In every limited moment of this swing, to dance is everything, and its fate is written in the frequency and the phase. Whether we wish it to continue, to stop, or to proceed differently, all is preordained. You can intervene, discard less-favored drawings, no matter — it will always begin again with the next cycle. This feeling of surrendering control — how marvelous it is.
So let's just glide, along the arrow of time. Or perhaps, we could go back in time?